
What is Microceph and Ceph
Ceph is a highly scalable, open-source distributed storage platform. It supports object, block, and file storage, and is designed for large-scale, enterprise-level environments. Ceph provides robust features for redundancy, fault tolerance, and scalability, making it suitable for complex and demanding storage needs.
MicroCeph is a lightweight deployment and management tool for Ceph clusters. It simplifies the process of setting up and operating a Ceph-based distributed storage system, making it accessible even for smaller-scale environments like home clusters based, for example, on Raspberry Pi.
How to add a host to a cluster?
Once you setup your first Microceph node and initialized (bootstrapped) the cluster, it’s time to start adding more hosts. After all, a cluster with only one node does not make sense!
To do it, on every node you want to add, run following commands:
Install Microceph via snap
sudo snap install microcephOn the node you initialized the cluster run
sudo microceph cluster add {node-name}As a response you will get a token like
eyJzZWNyZXQiOiI1NDgyYjAzMjExMzMyNjkwNWZiM2FiMzMwZGZkY2QwNTdjNDgzZmNmN2MyMjQwOTUzYWQxMWQ3ODQxMDY4OTkyIiwiZmluZ2VycHJpbnQiOiIzMTA3ZDkxYWNhZjZhZGRmNzk1MmJhYzBkZTM0NDZhM2JhNDlmZTU1ZjkxZTE1MDViNzA3NTZmMzdjNWVjOTY2Iiwiam9pbl9hZGRyZXNzZXMiOlsiMTAuMC4yLjI6NzQ0MyIsIjEwLjAuMi4zOjc0NDMiLCIxMC4wLjIuNDo3NDQzIiwiMTAuMC4yLjU6NzQ0MyJdfQ==
Copy it to the clipboard, in will be needed in the next step
On the new node run
sudo microceph cluster join {token}At this point, your node is a member of a cluster! However, it’s not the end, as it still does not contribute the storage. We still have to add a disk.
As most probably your Raspberry Pi does not have separate drive attached you can spare as a Ceph OSD, we can just make a file that will act as a storage spece. Following line adds a 80 gigabytes OSD to the cluster
sudo microceph disk add loop,80G,1Finally, we can check if everything works like expected by running:
sudo microceph statusand
sudo microceph.ceph status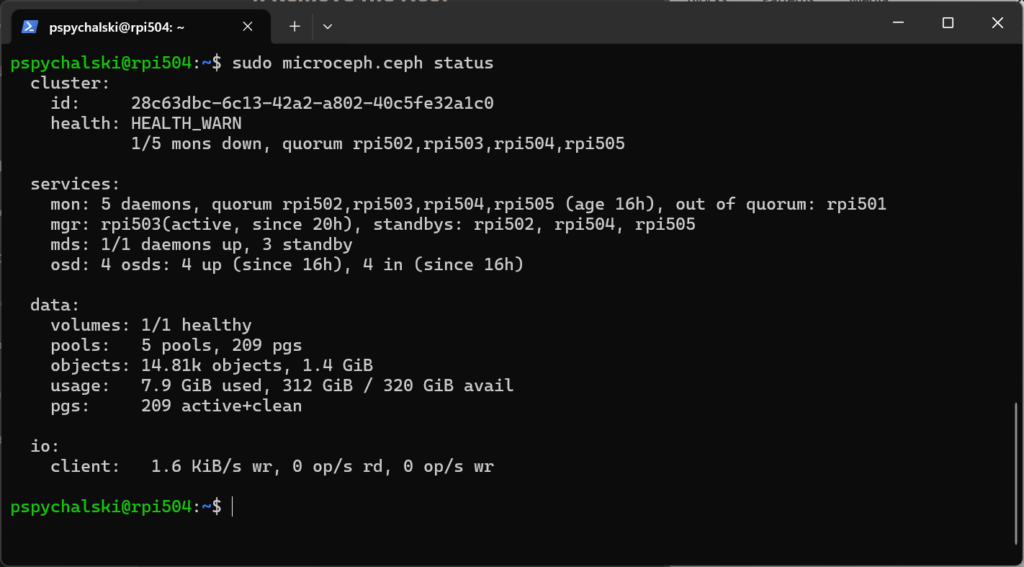
How to remove a host
Host removal from Microceph cluster is basically an oposite of the adding process.
First let’s check if our cluster is in a good health.
sudo microceph.ceph statusRemember that your cluster needs at least as many OSD (and usually nodes) as it’s replication factor. By default, replication factor is 3, so at least 3 nodes should always exist. I my case I have 4 healthy nodes: rpi502, rpi503, rpi504 and rpi505. Plus, one not healthy rpi501 but we will not worry about it at the moment. I want to remove the node rpi502 and cluster has enough spares to handle that.
First let’s see which disks (OSD) are attached to which nodes by showing OSD tree
sudo microceph.ceph osd tree
Or just by listing all disks
sudo microceph disk list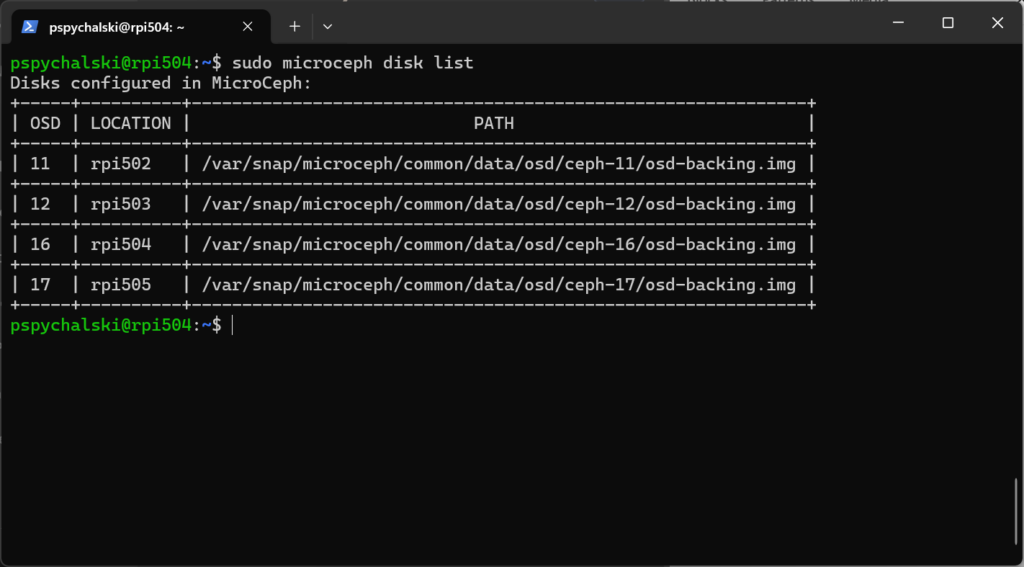
In both cases result is the same. Host rpi502 has one OSD attached with ID 11.
So, first let’s remove the OSD
sudo microceph disk remove osd.11And then remove host rpi502 from the cluster
sudo microceph cluster remove rpi502Finally, run
sudo microceph statusand
sudo microceph.ceph statusto confirm Ceph cluster is still in a good shape.


